



Showing posts with label blog buttons. Show all posts
Showing posts with label blog buttons. Show all posts
Thursday, April 15, 2010
One of my goals for 2010 with my blog is to share some of what I’ve learned since I started blogging. I am in no way an expert, nor would I ever claim to be, but I have amassed a wealth of knowledge on everything from design to coding and I want to share that with all of you!
When I was a new blogger I knew nothing at all about being a blogger or running a blog, and if it weren't for the amazing ladies who took time out of their busy schedules to help me I’d have probably given up fairly quickly. Of course, I didn’t give up and a little over a year later here I am passing on some of what I’ve learned to all of the newbie bloggers out there in the blogosphere!
The first topic I decided to tackle is blog buttons—you know the cute little 125x125 buttons that everyone has on their blogs—they are actually very easy to make and I’m going to show you how.
First thing’s first…you have to design your button…if you already have a button designed then you can skip this part and go straight to Step 4. I use Paint.net it’s free and fairly easy to use, but there are many programs out there you can utilize for this task.
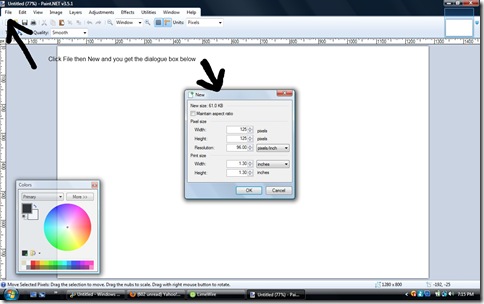
Step 1: Start Paint, click File then New and a dialogue box pops up that allows you to choose the size of the new box. Type in 125 Width and 125 Height (under Pixel Size) then click OK.
Step 2: Once you click OK you will be taken to your 125x125 image. Now is the time to be creative, you can design your button simply with a color that compliments your blog and text, or you can get even more creative and use images and background patterns. For the purpose of this demonstration I’ll show you a basic button with one color and text.

Step 3: When you’ve decided on a color and the font all you have to do is place your blog name on the “button” and save it.

Step 4: Once you’ve designed and saved your blog button you need to upload it to a photo sharing site like Photobucket. When your button has been uploaded to Photobucket you need to find the Direct Link to the image and copy it.

Step 5: Now all you have to do is code the button, which is super easy as long as you know what code to use. The code below is the code for a blog button with scroll box below. Place your image link and blog URL into the correct places and you will end up with your finished Blog Button similar to the blog button below!

I hope this tutorial helps you pimp your blog (I know how cheesy, but I couldn’t resist)! If there are any tutorials that you would like to see please leave me a comment below and let me know!
When I was a new blogger I knew nothing at all about being a blogger or running a blog, and if it weren't for the amazing ladies who took time out of their busy schedules to help me I’d have probably given up fairly quickly. Of course, I didn’t give up and a little over a year later here I am passing on some of what I’ve learned to all of the newbie bloggers out there in the blogosphere!
The first topic I decided to tackle is blog buttons—you know the cute little 125x125 buttons that everyone has on their blogs—they are actually very easy to make and I’m going to show you how.
First thing’s first…you have to design your button…if you already have a button designed then you can skip this part and go straight to Step 4. I use Paint.net it’s free and fairly easy to use, but there are many programs out there you can utilize for this task.
Step 1: Start Paint, click File then New and a dialogue box pops up that allows you to choose the size of the new box. Type in 125 Width and 125 Height (under Pixel Size) then click OK.

Step 2: Once you click OK you will be taken to your 125x125 image. Now is the time to be creative, you can design your button simply with a color that compliments your blog and text, or you can get even more creative and use images and background patterns. For the purpose of this demonstration I’ll show you a basic button with one color and text.

Step 3: When you’ve decided on a color and the font all you have to do is place your blog name on the “button” and save it.

Step 4: Once you’ve designed and saved your blog button you need to upload it to a photo sharing site like Photobucket. When your button has been uploaded to Photobucket you need to find the Direct Link to the image and copy it.

Step 5: Now all you have to do is code the button, which is super easy as long as you know what code to use. The code below is the code for a blog button with scroll box below. Place your image link and blog URL into the correct places and you will end up with your finished Blog Button similar to the blog button below!
<center><img src="Direct Image Link”></center><br/>
<center><textarea rows="4" cols="10" wrap="hard">
<center><a href="Your Blog URL”><img src="Direct Image Link”></a></center>
</textarea><span style="font-weight:bold;"><span style="font-weight:bold;"></span></span></center>
<center><a href="Your Blog URL”><img src="Direct Image Link”></a></center>
</textarea><span style="font-weight:bold;"><span style="font-weight:bold;"></span></span></center>
I hope this tutorial helps you pimp your blog (I know how cheesy, but I couldn’t resist)! If there are any tutorials that you would like to see please leave me a comment below and let me know!
Wednesday, April 15, 2009
As you can see I found a new layout and I LOVE it! I have to admit I chose it because of the tabs at the top which I can not seem to use (must be because I don't own my domain name?) I'm not sure why exactly so if you're reading this and you know why I can't edit them can you please leave me a comment and tell me. I don't much care because I love the layout...now I have to change my button..I see more HTML nightmares coming!
How do you like the new look?
How do you like the new look?
Saturday, January 17, 2009
So for weeks now (actually it's been longer than that, but there's no sense in me admitting that I'm that incompetent) I have been trying to make a button for my blog. Oh how I admired everyone else's buttons from a far...wishing and dreaming that one day I too would have one, but after many frustrating and unsuccessful attempts I had all but given up hope of having a button on my blog. Then a few days ago I was visiting my buddy Kel's blog and I read a post about her new blog button. Oh how I was invious...so I commeneted on how beautiful her button was and expressed my desire to have ione of my own...then yesterday as I was checking my email I noticed that I had an email from none other than Kel's button designer herself Keri @ Life of Logan and It Flickers Dimly (who by the way is a very funny lady who can write a pretty mean blog post...so you have to check her out!) saying that she could make a button for me...and today when I checked my email I opened it up and saw the button that I have been so unsuccessfully trying to make for the longest time! So this is my Thank You to Keri! She's the greatest and I LOVE, LOVE, LOVE my button!
<a href="http://misadventuresinbabyraising.blogspot.com/" target="_blank"><img border="0" alt="Photobucket" src="http://i732.photobucket.com/albums/ww323/vidasista/allison1.png"/></a>
So you guys have to check out Keri's blogs and you know ya gotta put my button on your blog because...well...because it would just make my day to stroll over to your blogs and see my shiny new button there!

<a href="http://misadventuresinbabyraising.blogspot.com/" target="_blank"><img border="0" alt="Photobucket" src="http://i732.photobucket.com/albums/ww323/vidasista/allison1.png"/></a>
So you guys have to check out Keri's blogs and you know ya gotta put my button on your blog because...well...because it would just make my day to stroll over to your blogs and see my shiny new button there!
Subscribe to:
Posts
(
Atom
)

Popular Posts
-
 Wow it's Day 9 in our Fun in the Sun summer blog party already? Time really does fly when you're having fun I guess! As always mak...
 -
 ~Adult Eyes Only Please~ Today is Day 6 of Misadventures in Baby Raising's Show Dad he's SUPER Giveaway Spectacular! I personally th...
 -
All of my children love to read, I find my oldest daughter’s reading for fun all the time and the babies love when mommy and daddy read them...
